When you’re ready to jump in, you’ll need a plant.
How you get that plant will be determined by what you have available to you. Focus on what you have on hand.
The easiest way to start is with “clone” or rooted cutting. Read more…
We often end up with more successful clones than we need (we always start more than we’ll need in case some don’t root successfully). When they all root, we end up with extras that we like to pass on to help get others going. We will soon post a blog about starting your own clones.
But if that’s not an option, starting marijuana plants from seed is the next best thing.
First get the seed. Depending on what’s available to you,
- A. Get a seed from a friend.
- B. You can grow seeds you find in marijuana. You may not be able to tell if the seedling is male or female until it starts to bloom (you don’t want male plants unless you are attempting to breed new strains of marijuana, that’s an advanced topic). But if you have these seeds, don’t be afraid to try them. You can start twice as many as you will need, then remove the male plants – generally half will be male.
- C. Purchase a seed from a seed bank. This costs more than other options but gives you more control. Read more…
- You can select the “strain” or genetic ancestry of the seeds. You get to choose the characteristics you’re looking for. For example, growing characteristics, like short blooming period, medium sized plant, easy to grow (tolerant of varying growing conditions). Or characteristics of the buds produced: for example: high THC content (the psycho-active chemical that gets you high), high CBD content (the chemical known for relaxation and reducing inflammation), and other characteristics like ability to reduce pain, likelihood to cause increase in appetite, flavors detected. Web sites like https://www.leafly.com can be helpful in determining the characteristics and strains you are looking for.
- We recommend selecting “feminized” seeds – ensuring that the plant is female. This lets you avoid the 50/50 chance of starting a male plant, only to have to start all over again after waiting until the plant starts the blooming cycle). Although the feminized seeds typically cost twice as much as non feminized seeds, in our opinion, it’s worth it.
- Some varieties also have “auto flowering” seeds – the plants will start their blooming cycle based on the plant’s age, not the light cycle (12/12). This means you don’t have to worry about starting the blooming cycle by changing the on/off time of your lights. This does simplify things, though we prefer to have more control of when blooming cycle starts: we start the bloom cycle when the plant is the size we want ti to be.
- Many seed banks will allow you to buy just one seed but will often give a discount on multiple seeds.
- A google search for best seed bank will give you a number of articles covering numerous seed banks.
- If you don’t what know strain to choose, we have found Gorilla Glue to be fast and easy to grow and really good quality. Great for beginners.
- We’ve had good service from https://www.seed-city.com
Items needed:
- 1 seed
- Distilled water (a gallon from the grocery is fine)
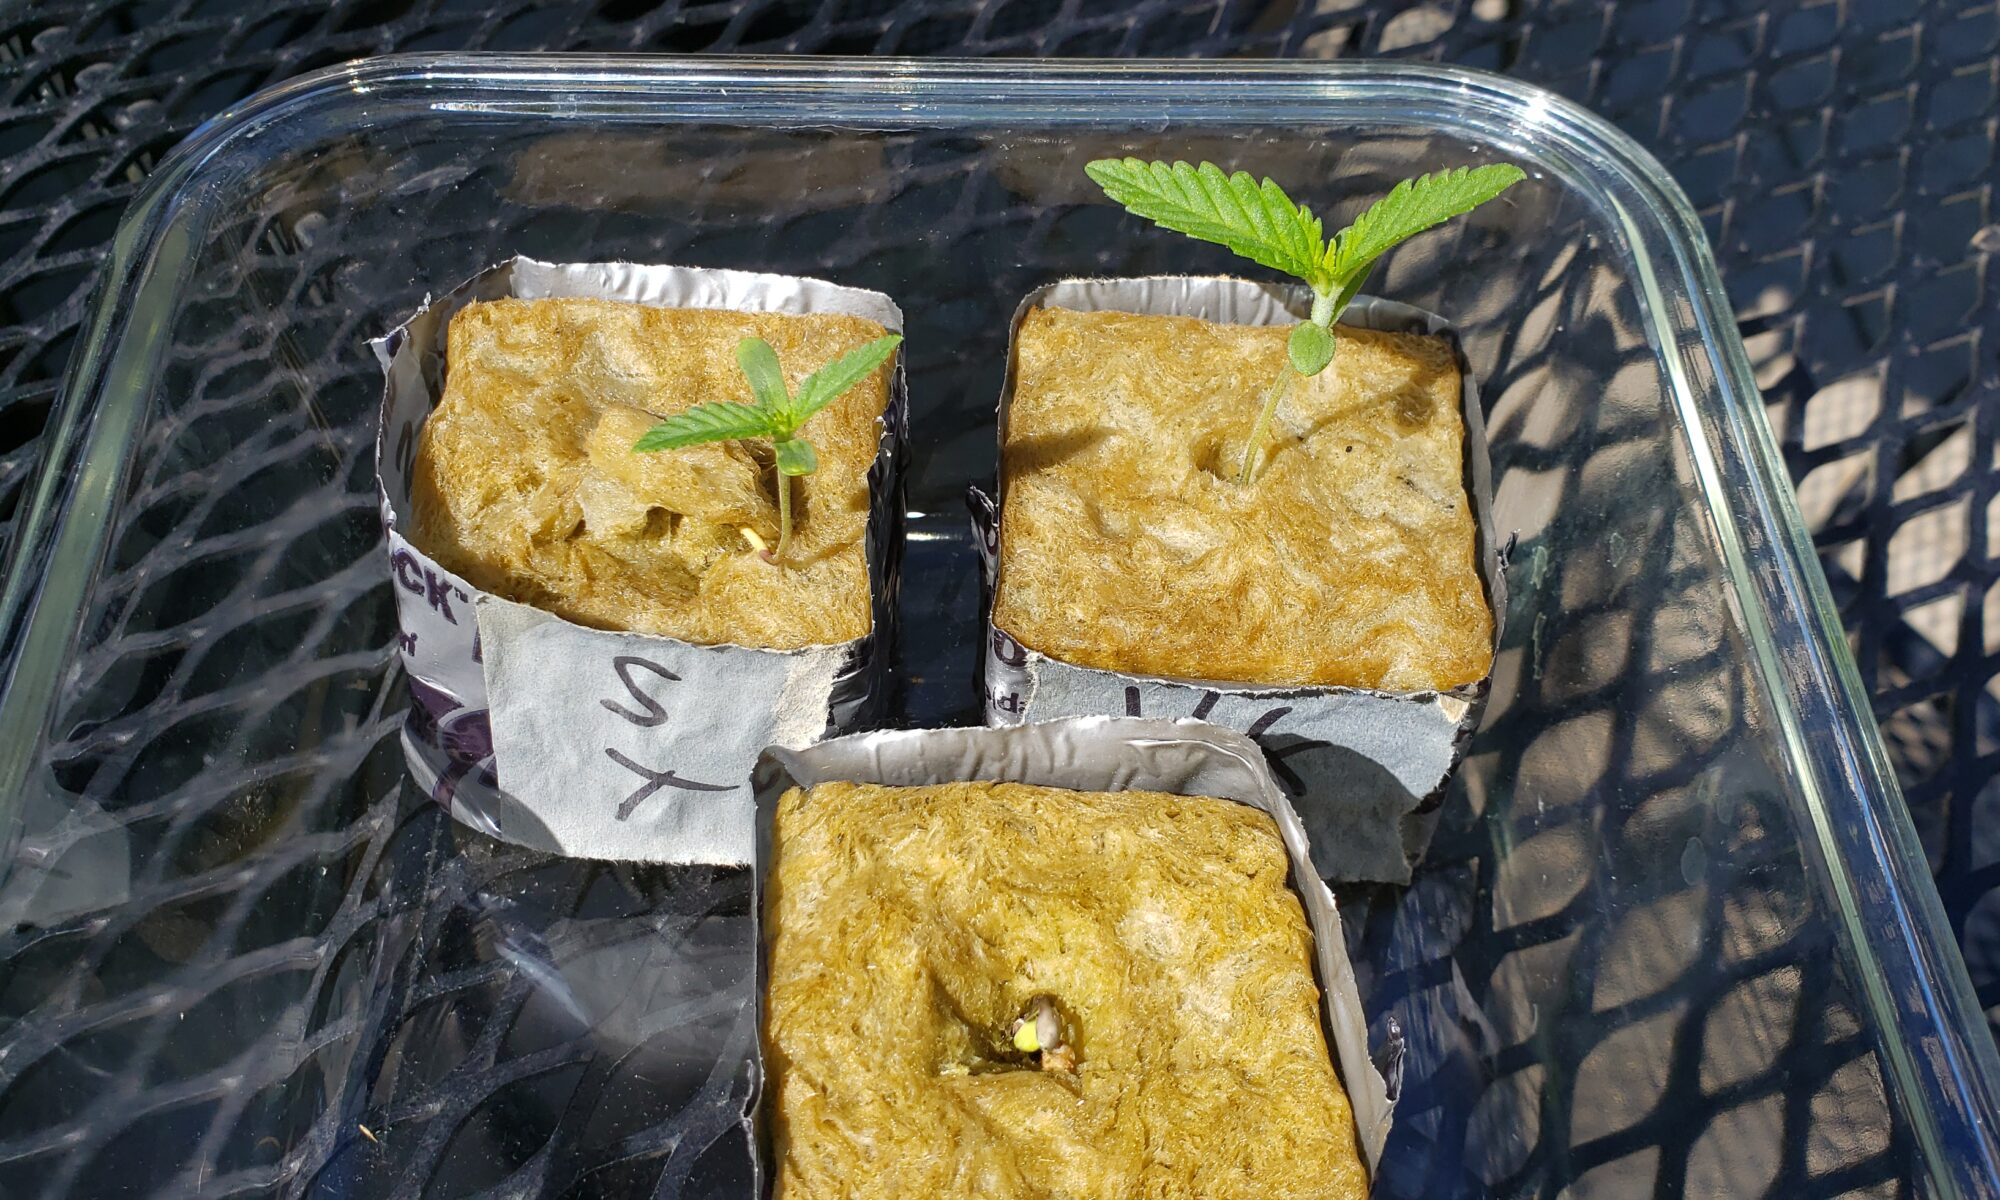
- A “rock wool” block These are what we use. Buy here…
We prefer to use 2 inch… read more…
We like to use 2″ rock wool blocks for (starting marijuana plants from seed as well as for cloning), with the grey plastic wrapped around the sides to keep in moisture and prevent roots from crossing to other blocks. You can use other seedling starters like peat pellets. Even dirt, though if you do, you’ll probably want to clean as much dirt off the roots as possible, if transplanting into a hydroponics system. If you use smaller blocks, and/or without the plastic around the sides of the block, you’ll need to be more careful not to let them dry out too much. - Small tray or plate to keep under the rock wool block.
Steps:
- Soak the rock wool block in the distilled water… Read more…
Leave the plastic sleeve around the block if it comes with one, but tear the paper connectors to separate out the blocks you are using. After soaking, shake it little to get a bit of water out. Be careful not to squeeze and crush the block. It will hold enough water to sustain a seed for several days. The rock wool blocks may suggest soaking them in water adjusted to be slightly acidic (pH around 6). But we’ve had good results from just using distilled water from the grocery. Just using our tap water has yielded poor results (our tap water is from a well and is somewhat alkaline, around 8 and seedlings do not like it.
- Place seed in the block (make a small hole, if the block doesn’t already have one… Read more…
If the block has a hole, you can drop the seed into the hole. If not, make a small hole in the block,
1/4 to 1/2 an inch deep (a pencil is about the right diameter). Some people to tear a bit of the rock wool off a corner and tuck it into the hole over the seed, though we usually don’t bother. Some people also like to soak the seed in a glass of water or wrapped in a wet paper towel in a plastic baggie in a warm place, overnight. But we haven’t found that to be necessary.
put seed in block (or in baggies, or glass of distilled water overnight) - Put it in a glass or on a dish in a warm place, a window sill or even on top of a refrigerator. At the very beginning, no light is necessary. After 2 or 3 days, the seed will germinate (or sprout) and then it will require some light. Sunlight is best but even a desk lamp will work.
- Every few days, add distilled water to the block as needed. Read more…
You don’t want to keep the block soaked, but you don’t want it to completely dry out, either. You can check how much water is in the block by carefully picking it up. If it’s light, like a completely dry block, add some more distilled water. The sprout will push it’s way out of the block and initially will have only two small leaves (these are actually the two halves of the seed). The shell of the seed, and an inner membrane should pop off naturally, but if the sprout gets too tall, two or three inches and the two seed halves haven’t opened up like leaves, you may want to gently help the shell and/or membrane off. You must be careful, as breaking anything at this stage could stop the sprout from growing.
- The seedling will soon gain height and will start to grow another set of leaves. Once we see the new set of leaves starting, we start feeding the seedling a bit of nutrition.
Mixing full strength and distilled water half and half. We do this by making of a gallon of “normal strength” nutrient solution using this:
We use either Maxi Grow (Buy here…)
or
Maxi Bloom (Buy here…) This is optimized for flowering stage, but also works well for growing.
We mix a teaspoon of the full strength and a teaspoon of distilled water in a small cup, then pour that into the block (you can pour into the top of the block, or pick up the block and hold it upside down and pour into the bottom of the block – the seedling should have enough roots to not fall out of the block. The seedling will tend to lean towards the light source, we like to turn it occasionally so it’s leaning away, so it will turn back towards the light to balance the plant out (normally it will slightly follow the sun as it moves across the sky).
- When the roots start to branch out of the bottom of the rock wool block, it’s time to transplant into a growing container. Read more…
We suggest something like “deep water culture” buckets, like this one (Buy here)
or
this one (Buy here)
We’ll talk more about this and continuing on from here in another blog post.
Please comment below and let us know if you have questions or if you started your own marijuana from seed!